

In this tutorial, I will show you how to create an app called the Rephrasing App. The app that you are going to build has a simple UI written in React, uses the ChatGPT API and is deployed on genezio.
It will have two main components: the frontend which will consist of a simple chat-like interface, and the backend which exposes a function meant to rephrase your input text. Once implemented, the Rephrasing App can be used to rephrase text, write better articles or even upgrade your CV.
Prerequisites:
Install npm
Have an IDE installed, I personally recommend Visual Studio Code
Create a free account on OpenAI
Introduction
ChatGPT and genezio
Since you are reading this, I assume you already know what ChatGPT is and how it works at its core. But how do you actually use it to build a working and useful app? Is it enough to call the API directly, or do you need to write other functions as well? How and where do you host it? I will work alongside you towards finding out the answers to most of these questions until the end of this article.
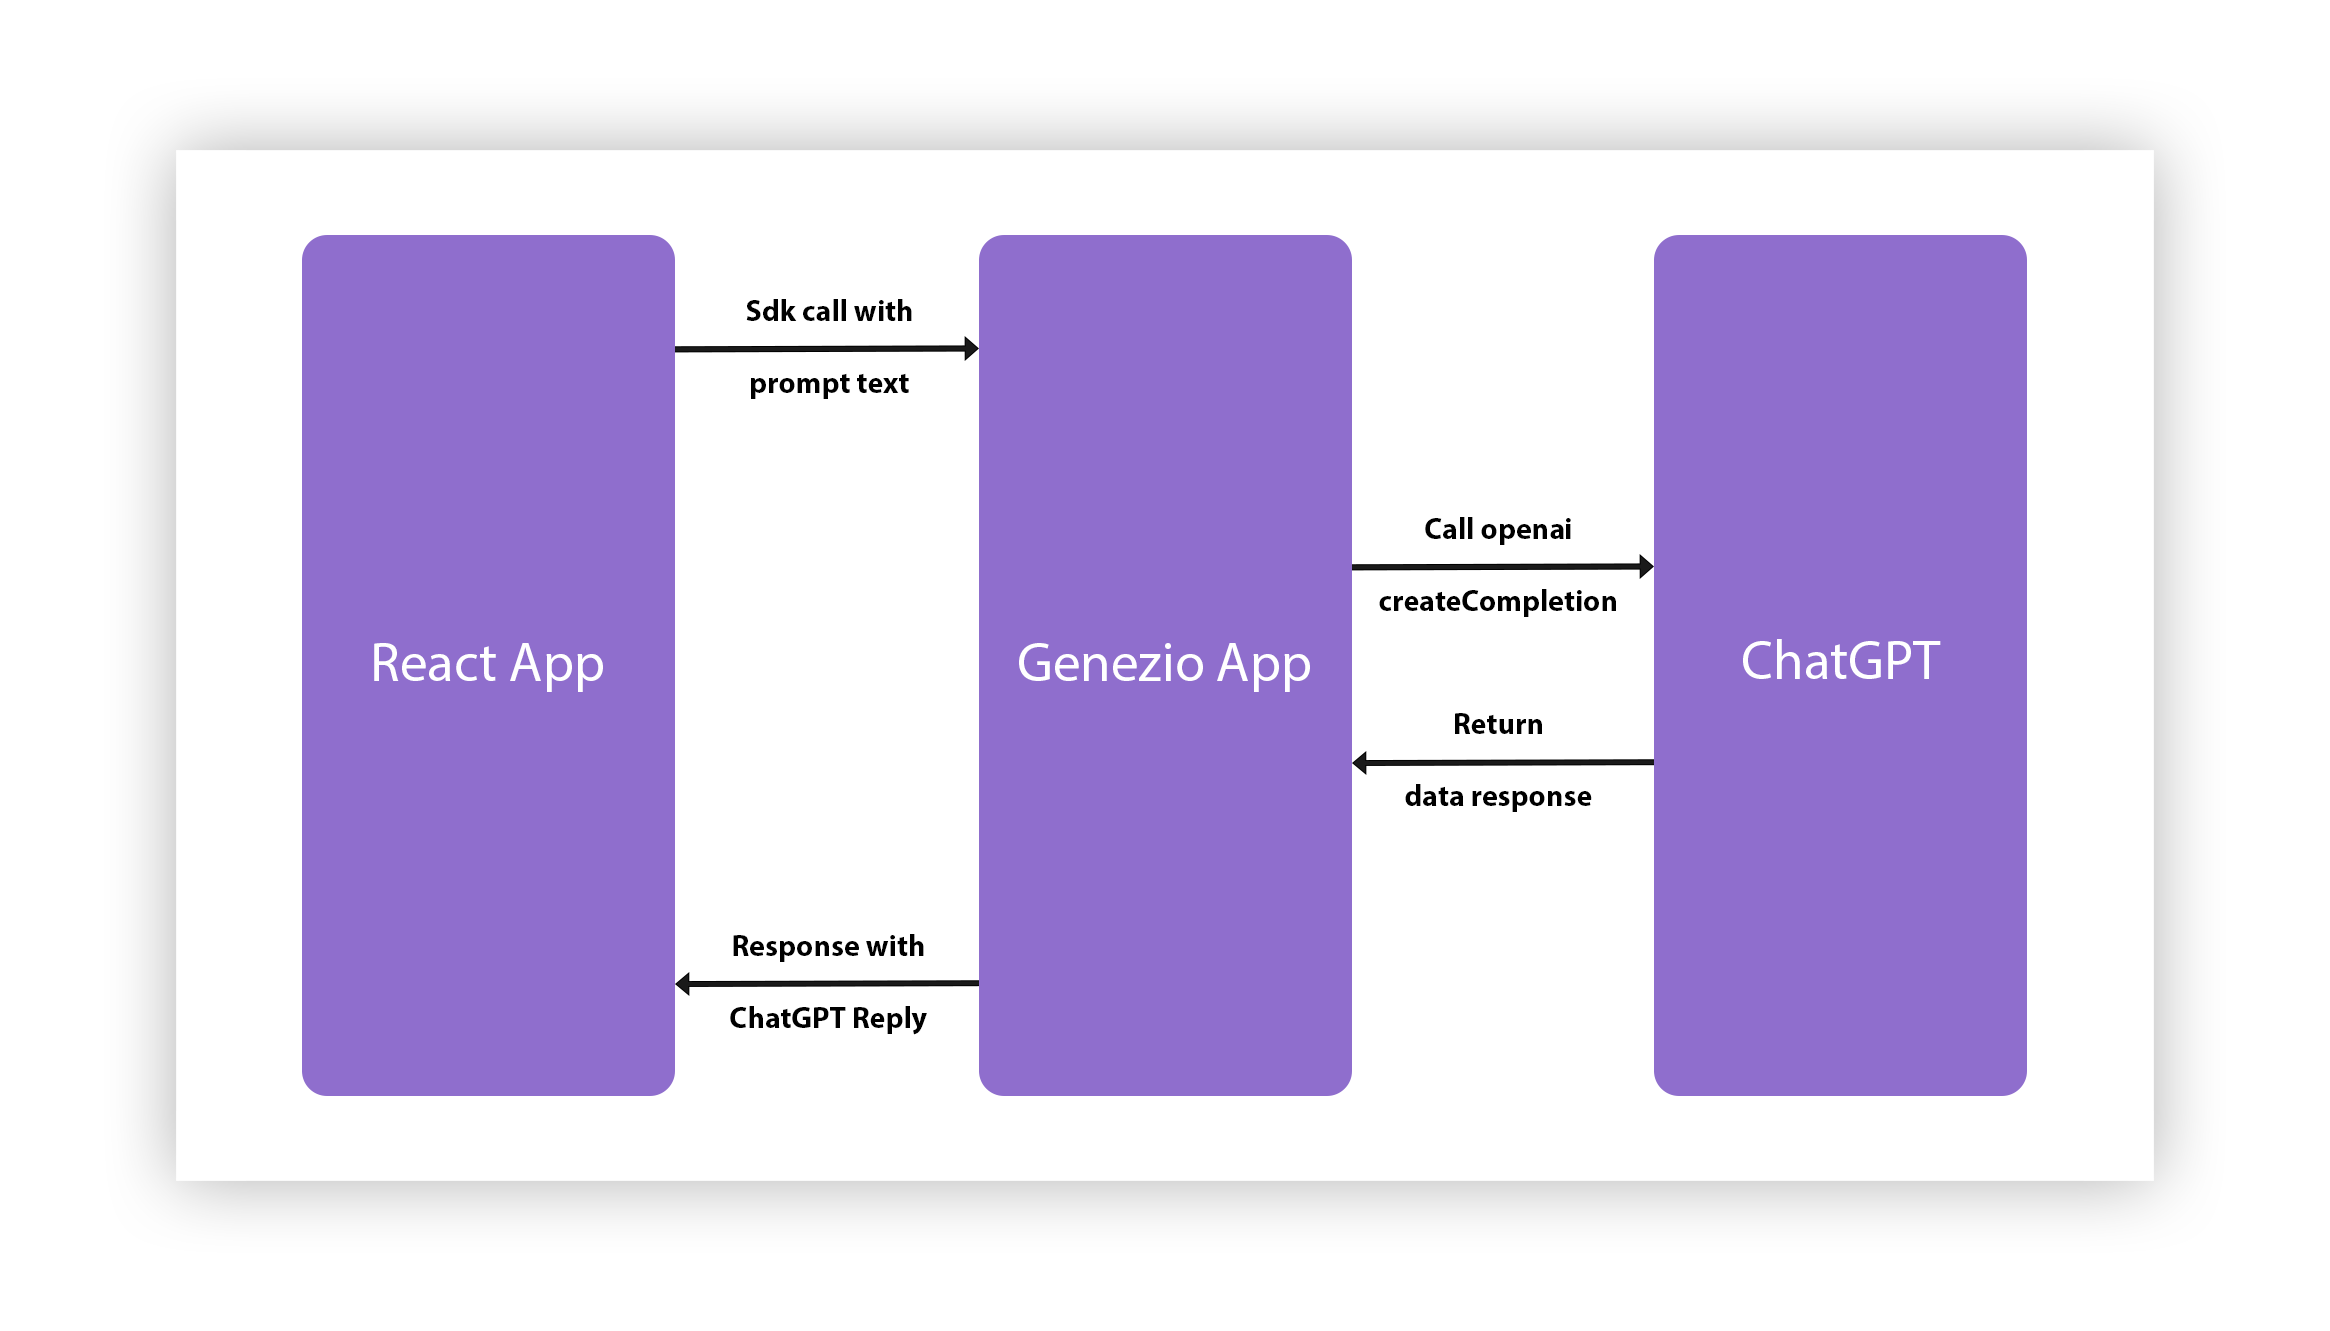
When deciding where to make the calls from, you have to keep in mind how secure you want this to be. So, as it is smart not to do them from the frontend, you are going to use genezio to host the backend and to call the OpenAPI from the genezio functions. For you to create a clearer idea about how this works, take a look at this illustration:
Now, let’s dive in! You can find the complete project here .
Configuration
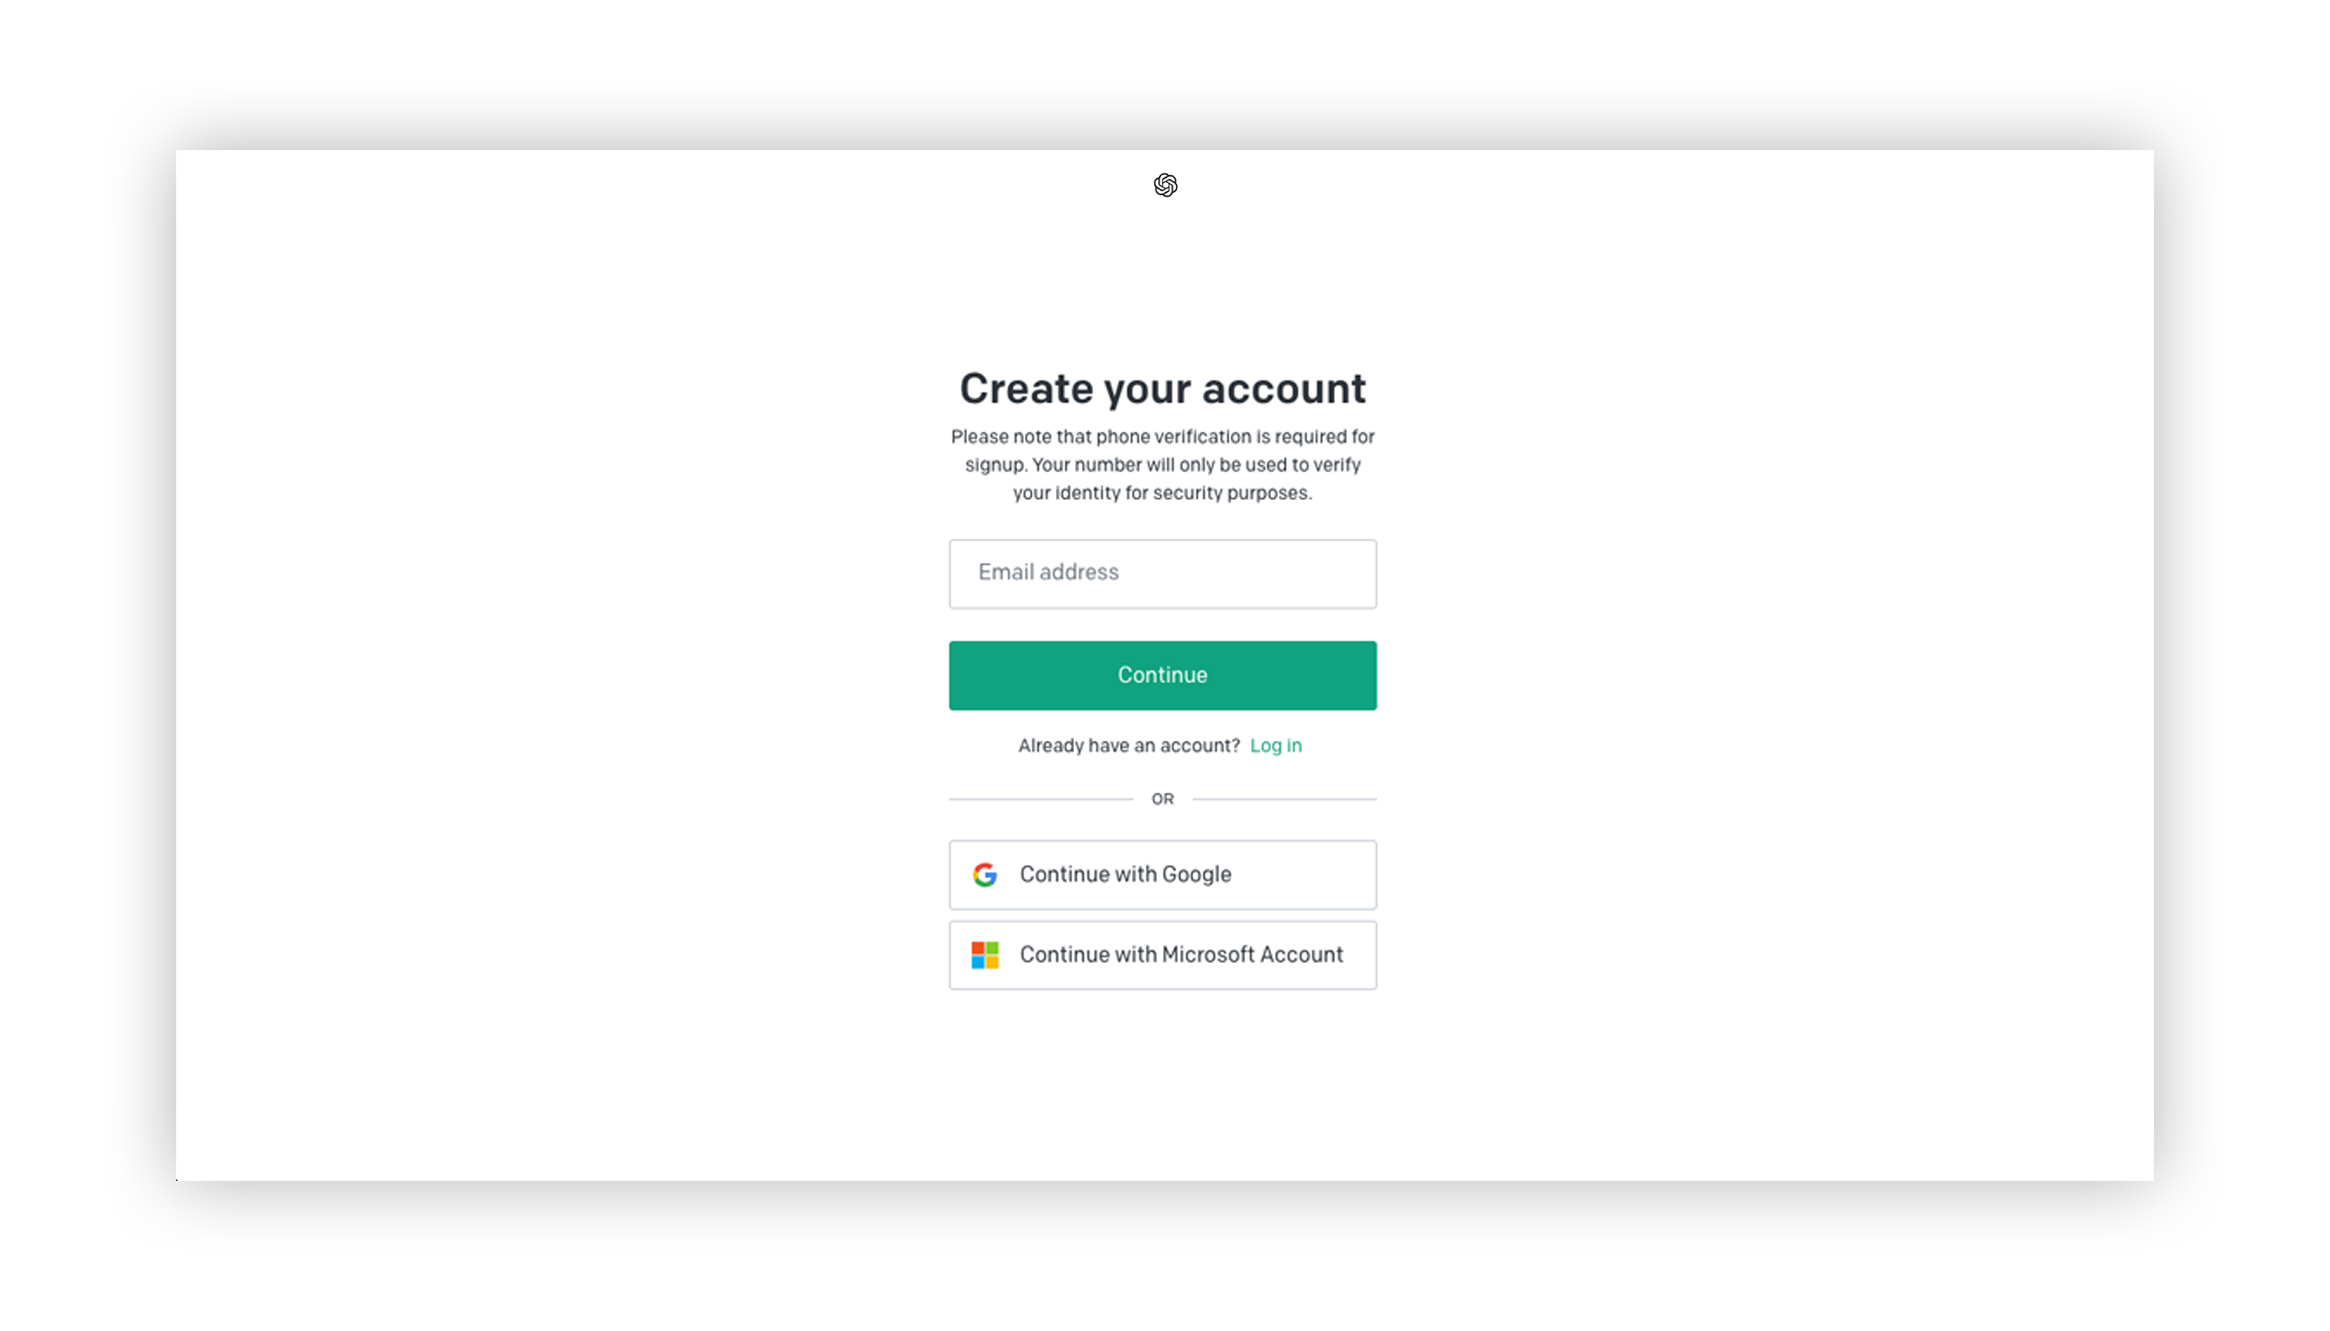
Get the API Key from OpenAI
- Go to the OpenAI website and create an account.
Click on the “Create new secret key” button.
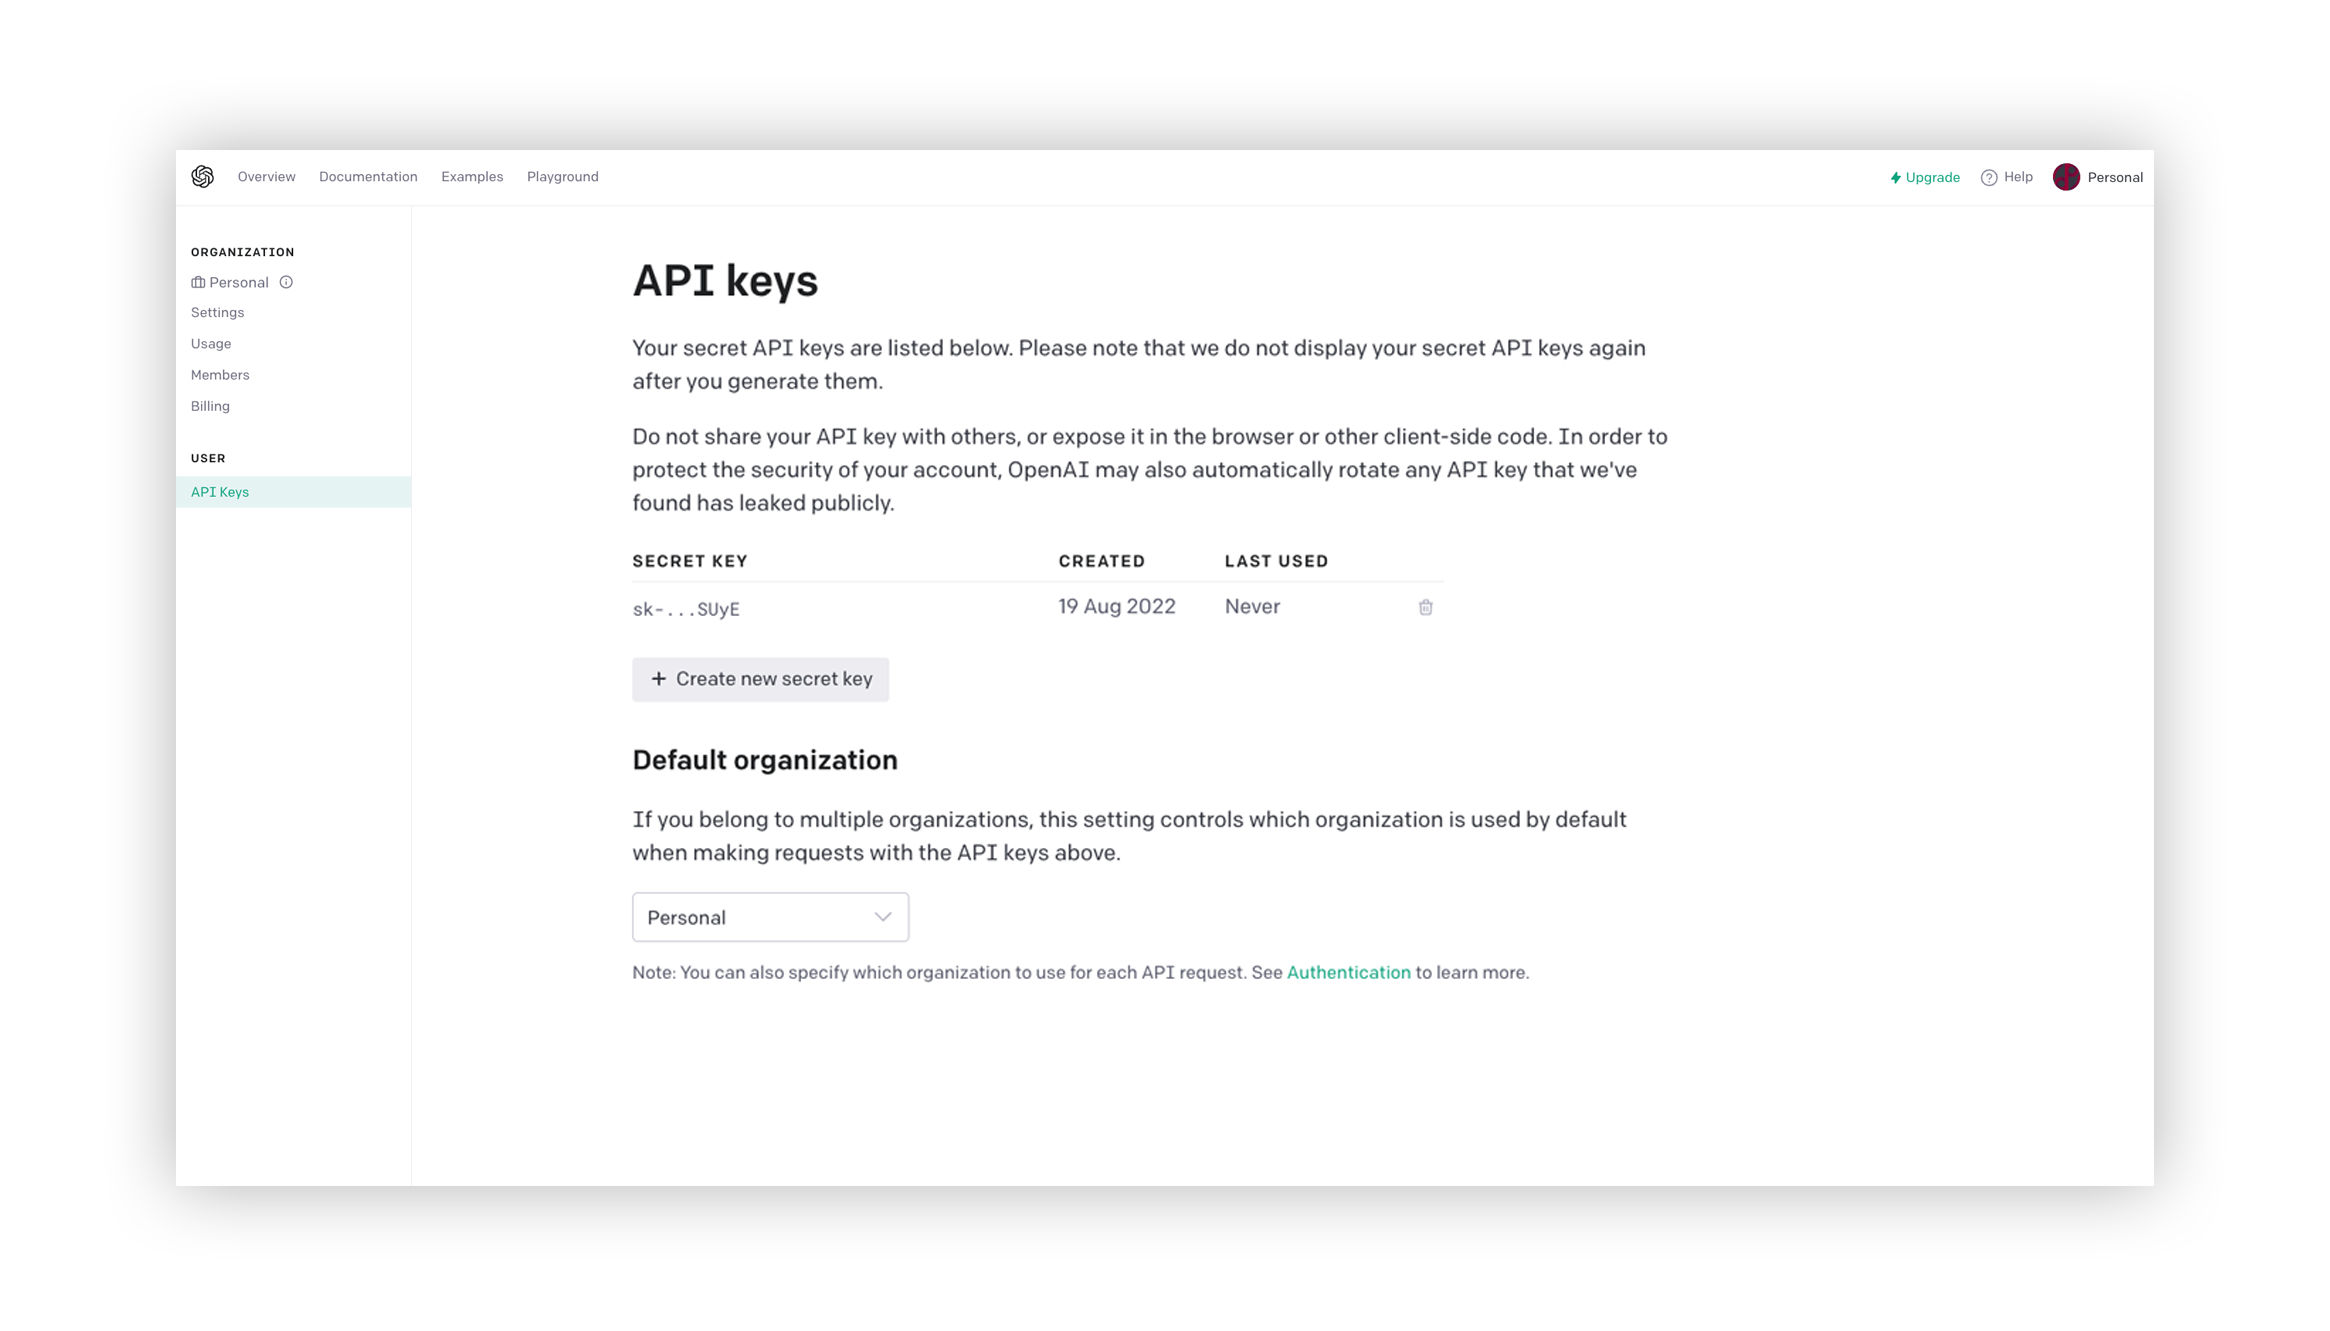
Note: Remember to keep your API key secure and do not share it with anyone.
- To be able to use this API Key, you will need to have funds in your OpenAI account. Go to platform.openai.com/account/billing/overview and add some funds to your account.
Set Up genezio
First, install genezio using npm:
npm install genezio -g
Then, use this command to log in:
genezio login
Create a new project:
genezio create fullstack --backend=ts --frontend=react-ts --name=chatgpt-project --region=us-east-1
The Server-side Project
Change into the newly created server folder:
cd ./chatgpt-project/server
Now, you’re ready to install openai:
npm install openai
Note: This npm package provides a convenient way to access OpenAI API from any JavaScript application.
Implement the Backend Class
You will implement a class containing a function that you will deploy and then call it from the frontend application.
Create the .env file in the server directory and add the following variable that will store your OpenAI secret key from your OpenAI account:
OPENAI_SECRET_KEY=<your_secret_key>
Create a new file called gptCaller.ts in the server directory.
Open the newly created gptCaller.ts file and start by adding the dependencies:
server/gptCaller.ts

import OpenAI from "openai";
import { GenezioDeploy } from "@genezio/types";
In the constructor of the class, instantiate the openai object:
server/gptCaller.ts

@GenezioDeploy()
export class GptCaller {
  openai: OpenAI | null = null;

  constructor() {
    this.openai = new OpenAI({
      apiKey: process.env.OPENAI_SECRET_KEY,
    });
  }
}
Now you can create the class and the async method that will receive the input text from the frontend app. It will call ChatGPT, and then send the response back to the frontend.
Take a look at the complete file code:
server/gptCaller.ts

import OpenAI from "openai";
import { GenezioDeploy } from "@genezio/types";

@GenezioDeploy()
export class GptCaller {
  openai: OpenAI | null = null;

  constructor() {
    this.openai = new OpenAI({
      apiKey: process.env.OPENAI_SECRET_KEY,
    });
  }
  // send a request to the ChatGPT API to get the requestText
  async askChatGPT(requestText: string) {
    const completion = await this.openai?.chat.completions.create({
      // the used model at the moment of writing this article
      model: "gpt-3.5-turbo",
      // tells ChatGPT to rephrase the requestText
      messages: [{ role: "user", content: "rephrase this:" + requestText }],
    });

    console.log(
      `DEBUG: request: ${requestText}, response: ${completion?.choices[0].message}`
    );
    return completion?.choices[0].message.content;
  }
}
Note: Please make sure to check out the OpenAI API Official Documentation for more information.
Now run the following command in the root directory to test your backend locally:
genezio local
The Client-side React Project
Go to the client folder in a new terminal and install the necessary dependencies:
cd ./client
npm install
Implement the User Interface
In this part of the article, you will create the UI for chatting with the backend. This is in the src/App.tsx file.
Delete what is inside the App.tsx file so we can start from scratch and better explain our approach.
First, import the dependencies from react, SDK, and CSS:
client/src/App.tsx

import { useState } from "react";
import { GptCaller } from "@genezio-sdk/chatgpt-project";
import "./App.css";
In the App component you will need 3 useState objects for the messages, requestText, and a boolean variable for the request - isRequesting:
client/src/App.tsx

// each mesage format: {text: "message", isUser: true/false}
const [messages, setMessages] = useState<Array<any>>([]);
const [requestText, setRequestText] = useState<string>("");
const [isRequesting, setIsRequesting] = useState<boolean>(false);
You will also need to write a method for sending the request:
client/src/App.tsx

function sendRequest(e: any) {
  e.preventDefault();
  setIsRequesting(true);
  GptCaller.askChatGPT(requestText)
    .then((response) => {
      setMessages([
        {
          text: requestText,
          isUser: true,
        },
        {
          text: response,
          isUser: false,
        },
      ]);
      setRequestText("");
      setIsRequesting(false);
    })
    .catch((err) => {
      console.log(err);
      setIsRequesting(false);
    });
}
For displaying the user’s input text and the response generated by ChatGPT, you need 2 elements. On the left side of the screen text generated by ChatGPT will be displayed, and on the right, there will be the user text.
This will be done in a map of the messages:
client/src/App.tsx

{
  messages.map((message, index) => {
    if (message.isUser) {
      return (
        <div className="msg right-msg" key={index}>
          <div className="msg-bubble">
            <div className="msg-info">
              <div className="msg-info-name">You</div>
            </div>

            <div className="msg-text">{message.text}</div>
          </div>
        </div>
      );
    } else {
      return (
        <div className="msg left-msg" key={index}>
          <div className="msg-bubble">
            <div className="msg-info">
              <div className="msg-info-name">ChatGPT</div>
            </div>

            <div className="msg-text">{message.text}</div>
          </div>
        </div>
      );
    }
  });
}
To finish, you need a form with an input text box where the user can enter the text:
client/src/App.tsx

<form className="msger-inputarea" onSubmit={(e) => sendRequest(e)}>
  <input
    type="text"
    className="msger-input"
    placeholder="Enter your message..."
    value={requestText}
    onChange={(e) => setRequestText(e.target.value)}
  />
  <button type="submit" className="msger-send-btn" onClick={(e) => sendRequest(e)}>
    {isRequesting ? "Sending..." : "Send"}
  </button>
</form>
Complete code file:
client/src/App.tsx

import { useState } from "react";
import { GptCaller } from "@genezio-sdk/chatgpt-project";
import "./App.css";

function App() {
  // each mesage format: {text: "message", isUser: true/false}
  const [messages, setMessages] = useState<Array<any>>([]);
  const [requestText, setRequestText] = useState<string>("");
  const [isRequesting, setIsRequesting] = useState<boolean>(false);

  function sendRequest(e: any) {
    e.preventDefault();
    setIsRequesting(true);
    GptCaller.askChatGPT(requestText)
      .then((response) => {
        setMessages([
          {
            text: requestText,
            isUser: true,
          },
          {
            text: response,
            isUser: false,
          },
        ]);
        setRequestText("");
        setIsRequesting(false);
      })
      .catch((err) => {
        console.log(err);
        setIsRequesting(false);
      });
  }

  return (
    <div className="App">
      <section className="msger">
        <header className="msger-header">
          <h4>Rephrasing app using ChatGPT, genezio and React</h4>
        </header>

        <main className="msger-chat">
          {messages.map((message, index) => {
            if (message.isUser) {
              return (
                <div className="msg right-msg" key={index}>
                  <div className="msg-bubble">
                    <div className="msg-info">
                      <div className="msg-info-name">You</div>
                    </div>

                    <div className="msg-text">{message.text}</div>
                  </div>
                </div>
              );
            } else {
              return (
                <div className="msg left-msg" key={index}>
                  <div className="msg-bubble">
                    <div className="msg-info">
                      <div className="msg-info-name">ChatGPT</div>
                    </div>

                    <div className="msg-text">{message.text}</div>
                  </div>
                </div>
              );
            }
          })}
        </main>

        <form className="msger-inputarea" onSubmit={(e) => sendRequest(e)}>
          <input
            type="text"
            className="msger-input"
            placeholder="Enter your message..."
            value={requestText}
            onChange={(e) => setRequestText(e.target.value)}
          />
          <button type="submit" className="msger-send-btn" onClick={(e) => sendRequest(e)}>
            {isRequesting ? "Sending..." : "Send"}
          </button>
        </form>
      </section>
    </div>
  );
}

export default App;
Note: We provide you with the complete CSS for this project in src/App.css.
Test your code
On the client folder start the frontend:
npm run dev
Open your browser and go to http://localhost:5173/ to see the app in action.
Deploy your project
Go to the root folder of your project and run the following command:
genezio deploy
This is it!
You can find the complete project on our Github
I hope that you found this tutorial informative and helpful, and I encourage you to check out our other articles for more tips and tricks on mastering your craft.
Let me know if you need help by contacting me on Discord or write me an email at contact@genez.io.
Subscribe to our newsletter
Genezio is a serverless platform for building full-stack web and mobile applications in a scalable and cost-efficient way.
Related articles


More from Tutorials