How to Use Genezio with Express for Easy and Error-Free API Management

13 minutes read

Bogdan Vlad
Apr 10, 2024
Share on:
Maintaining an API across multiple clients can be a tedious task. Some common hurdles are encountered by both backend and frontend software engineers:
- Synchronizing documentation with the underlying code
- Maintaining consistent data types in requests and responses across the entire system
- Managing errors consistently
In this article, I’ll share a really simple but effective method to help you solve these problems. We are going to use genezio to make the communication between server and clients easier to use, easier to maintain and less error prone.
The Classic Way
To better illustrate the problem and its solution, I propose anchoring the discussion in a very simple example: a mono repo project that contains a server written with ExpressJS and two clients: one written in React and another one in Flutter. The application keeps track of a list of books in memory.
The code snippets used in this article are available in this repository. To code alongside, clone the repository with the following commands:
git clone https://github.com/Genez-io/genezio-express-integration
Let’s first explore the backend a bit. This is a very simple express application that has a way to create books and retrieve a list of books from an in-memory store.
server/src/index.ts

// Define a type for the book structure
type Book = {
  id: number;
  title: string;
  author: string;
};

// In-memory store for books
let books: Book[] = [
  { id: 1, title: "The Great Gatsby", author: "F. Scott Fitzgerald" },
  // Add more book objects as needed
];

// GET route to fetch all books
app.get("/books", (req: Request, res: Response) => {
  res.json(books);
});

// POST route to create a new book
app.post("/books", (req: Request, res: Response) => {
  // Extracting book details from request body
  const { title, author } = req.body;

  if (!title || !author) {
    res.status(400).json({ error: "Missing parameter" });
    return;
  }

  // Creating a new book object
  const newBook: Book = {
    id: books.length + 1, // Simple ID generation strategy
    title,
    author,
  };

  // Adding the new book to our in-memory store
  books.push(newBook);

  // Responding with the newly created book
  res.status(201).json(newBook);
});
To call the two endpoints from a typescript React application, we would have to do something like this:
client-ts/src/requests.ts

// Define the interface for a book
type Book = {
  id?: number;
  title: string;
  author: string;
}

// Function to fetch all books
const fetchBooks = async () => {
  try {
    const response = await axios.get<Book[]>('http://localhost:8881/books');
    console.log(response.data); // Logs the array of books
  } catch (error) {
    console.error('Error fetching books:', error);
  }
};

// Function to create a new book
const createBook = async (newBook: Book) => {
  try {
    const response = await axios.post<Book>('http://localhost:8881/books', newBook);
    console.log(response.data); // Logs the newly created book
  } catch (error) {
    console.error('Error creating book:', error);
  }
};
In Flutter, we have something similar: we define a Book class, we handle the serialization, and we have two methods fetchBooks and createBook. You can explore the Flutter code
here
.
Now, let’s see what the problems we might get into:
- How do we keep in sync the API in all of our clients? If we add a new request on the backend side, we have to implement the call on all clients. Even worse, if a new property is added to the
Bookrequest model, this change has to be propagated and communicated to all clients. This can become tedious especially with larger teams. - How do we document the code? Of course, there are solutions: we could create a Swagger file or a Postman collection, but this adds one more item on the list of tasks that you have to do.
- How do we perform error handling? This is tightly coupled to the previous point, meaning that we have to document how we return errors (e.g: which ones are 400, which ones are 500 and what body they return).
The Genezio Way
Let’s see how we can make our lives a little bit easier. Genezio is a platform that simplifies the development and deployment of full-stack applications. However, you can also integrate the Genezio method of developing APIs into your existing Express.JS app. What Genezio does for you is automatically generate type-safe client code—we will refer to this as an SDK from now on—that enables remote invocation of backend methods. The generated code is fully documented and typed exactly as specified on the backend. You never have to worry about the clients being out of sync with the server.
To convert the book app to user genezio we have to do a couple of steps. First of all, we have to install genezio CLI:
npm install genezio -g
Next, create a new file server/src/book.ts and implement the ‘books’ business logic there:
server/src/book.ts

type Book = {
  id: number;
  title: string;
  author: string;
};

// genezio: deploy
export class BookService {
  books: Book[] = [];

  /**
   * Retrieves all books from the store.
   *
   * @returns {Promise<Book[]>} A promise that resolves with an array of Book objects.
   */
  async getAllBooks(): Promise<Book[]> {
    return this.books;
  }

  /**
   * Creates a new book and adds it to the store.
   * @param {string} title - The title of the book.
   * @param {string} author - The author of the book.
   * @returns {Promise<Book>} A promise that resolves with the newly created Book object.
   */
  async createBook(title: string, author: string): Promise<Book> {
    if (!title || !author) {
      throw new Error("Title and author are required.");
    }

    const newBook: Book = {
      id: this.books.length + 1, // Simple ID generation strategy
      title,
      author,
    };

    // Adding the new book to our in-memory store
    this.books.push(newBook);

    return newBook;
  }
}
We have to include this class in express using an adapter to make it available and waiting for requests on port “8881”. Install the @genezio/adapters package in the server folder.
This adapter will take genezio classes and it will expose them publicly with express.
npm install @genezio/adapters
server/src/index.ts

import  express from 'express';
import * as genezioAdapters from "@genezio/adapters";
import { BookService } from "./bookService.ts";
import cors from "cors";
const app = express();
const port = 8881;

app.use(cors());
app.use(express.json());
app.post("/genezio", genezioAdapters.createExpressRouter([BookService]));

app.listen(port, () => {
  console.log(`Example app listening at http://localhost:${port}`);
});
Excellent! But how do we call BookService.getAllBooks from our clients? This is where the genezio CLI comes into the picture. We will illustrate how to convert the TypeScript client to genezio. The process for Flutter is very similar. Run the following command in the server/ folder.
This command will scan for genezio classes marked with the comment //genezio: deploy and it generates the SDK in the language that you desire, which you can then use to invoke the backend methods.
genezio sdk --tarball --source local --packageName genezio-sdk --output ../client-ts/sdk --language ts --url http://localhost:8881/genezio
If you’re curious, take a look at what was generated at path ../client-ts/sdk. It’s a tarball NPM package, which means it can be installed locally just like any other NPM package. It could also be published to a public registry such as the NPM Registry, or to a private registry. You can also export the SDK as raw files by omitting the --tarball option. This allows you to use npm link if you wish, or to add a README, or modify the package.json before publishing it.
For the sake of this tutorial, we are going to install the SDK locally. In ./client-ts folder, we can run npm install ./sdk/genezio-sdk.tar.gz which will install the SDK in your node_modules folder.
npm install ./sdk/genezio-sdk.tar.gz
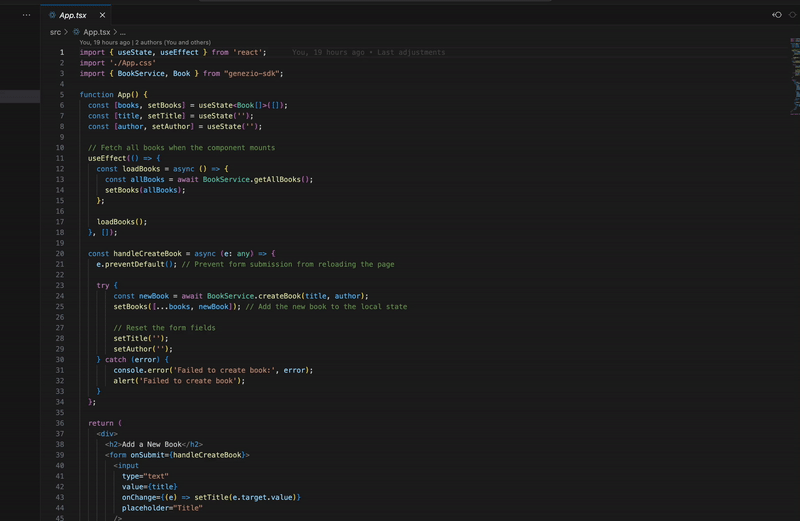
We are now ready to change the communication between React and the server to use genezio. Go to src/App.tsx and import the BookService and the Book model.
client-ts/src/App.tsx

import { BookService, Book } from "genezio-sdk"
You can remove the requests.ts file from the project and you can uninstall axios. It feels great when you remove code, doesn’t it? Now we just have to use BookService.getAllBooks and BookService.createBook from the genezio SDK to call our backend methods.
client-ts/src/App.tsx

  // Fetch all books when the component mounts
  useEffect(() => {
    const loadBooks = async () => {
      const allBooks = await BookService.getAllBooks();
      setBooks(allBooks);
    };

  loadBooks();
}, []);

const handleCreateBook = async (e: any) => {
  e.preventDefault(); // Prevent form submission from reloading the page

  const newBook = await BookService.createBook(title, author);
  setBooks([...books, newBook]); // Add the new book to the local state

  // Reset the form fields
  setTitle("");
  setAuthor("");
};
What is great now is that we can leverage the IDE capabilities. Hover over the BookService.getAllBooks() method and you can see: the documentation, the parameter types and the return type of the method. Pass a wrong parameter to BookService.createBook() and your IDE will shout that there is something wrong.
Let’s see how we handle errors. Easy! Just like you would normally do with Promises, you can either call .catch or wrap the await call around a try catch.
client-ts/src/App.tsx

try {
  const newBook = await BookService.createBook(title, author);
  setBooks([...books, newBook]); // Add the new book to the local state

  // Reset the form fields
  setTitle("");
  setAuthor("");
} catch (error) {
  console.error("Failed to create book:", error);
  alert("Failed to create book");
}
That’s it for today! To test the application end-to-end you’ll need to start the backend and client, as well. Navigate to the server directory and run the following commands:
npm install && npm run build && npm start
To start the React client, navigate to the client-ts/ directory and run the command below. Your frontend will be rendered locally at the given URL.
npm install && npm run dev
To start the Flutter client, navigate to the client-flutter/ folder and run the corresponding command:
flutter run
Conclusion
We now can write the backend code once and generate the code responsible for making the calls directly from it. We have a documented, typed safe API that is easy to use and keep in sync.
If you want the full code version to play around with it, check out this repository . It contains two branches: “express” and “genezio” and you can switch between them to compare the two approaches. I hope this was useful and if you have any feedback you can reach out at bogdan@genez.io.
Subscribe to our newsletter
Genezio is a serverless platform for building full-stack web and mobile applications in a scalable and cost-efficient way.
Related articles


More from Tutorials
Implement a newsletter on static websites with Mailchimp or HubSpot
Tudor Anghelescu
Mar 21, 2024