Implement a shopping cart using TypeScript, Redis and React

30 minutes read

Andreia Ocanoaia
Dec 04, 2023
Share on:
In this tutorial, I’ll show you how to use Redis, NodeJs, and React to easily implement a shopping cart for your online store.
There are a lot of things to consider when implementing a shopping cart functionality for an online store. The cart feature should be scalable, fast, and robust to offer your users a great experience.
The best part of this tutorial is that you can easily extend it or integrate it with an existing application.
Let’s get started! 🚀
Content
- Introduction
- Prerequisites
- Getting Started
- Setting up the backend
- Setting up the frontend
- Deploying the application
- Improvements
- Conclusion
Introduction
A possible implementation of a shopping cart is to store the items as a cookie on the client side. The disadvantage of this approach is that the cookie is attached to every request and large cookies can significantly slow down your application.
A better option is to use a Redis database on the server side to store items persistently and retrieve them very fast when needed.
This tutorial will show you how to harness the speed of a Redis database to build a shopping cart functionality using TypeScript/NodeJs.
Expand this section to get more information on what’s Redis
Redis is an open-source, in-memory database that stores key, value pairs. Redis is a highly versatile and performant database system. One of Redis’s key features is its speed, as it primarily operates in memory, enabling rapid data access. It is widely used for caching, real-time analytics, message brokering, and other applications where low-latency and high-throughput data storage and retrieval are crucial. Redis also provides persistence options, allowing data to be saved to disk for durability. Its simplicity, efficiency, and support for advanced data structures make Redis a popular choice for applications requiring fast and scalable data storage and retrieval.
Upstash is a cutting-edge platform for modern developers seeking seamless data management in serverless and cloud-native applications. Offering Redis-compatible, in-memory database services, Upstash simplifies data storage and access, making it a natural fit for serverless functions, web apps, and cloud-native architectures.
By partnering with Upstash, genezio provides an easy-to-use solution to add an Upstash Redis database to your project from the genezio dashboard.
On the frontend side, we’ll use React and Bootstrap to implement a minimal frontend for the online store. The great part about a minimal design is that you can go as wild as you’d like with the frontend and tweak it further to your liking.
Expand this section to get more information on what’s React and Bootstrap
Bootstrap is a widely-used open-source frontend framework that helps you minify your frontend application by providing a responsive grid system and lots of pre-designed components.
Reactstrap is a library that brings Bootstrap components into React applications. Reactstrap provides React-friendly versions of Bootstrap components, allowing developers to use the power of Bootstrap’s styling and functionality within a React application.
We will use genezio to help you scaffold the web app and deploy it to the cloud.
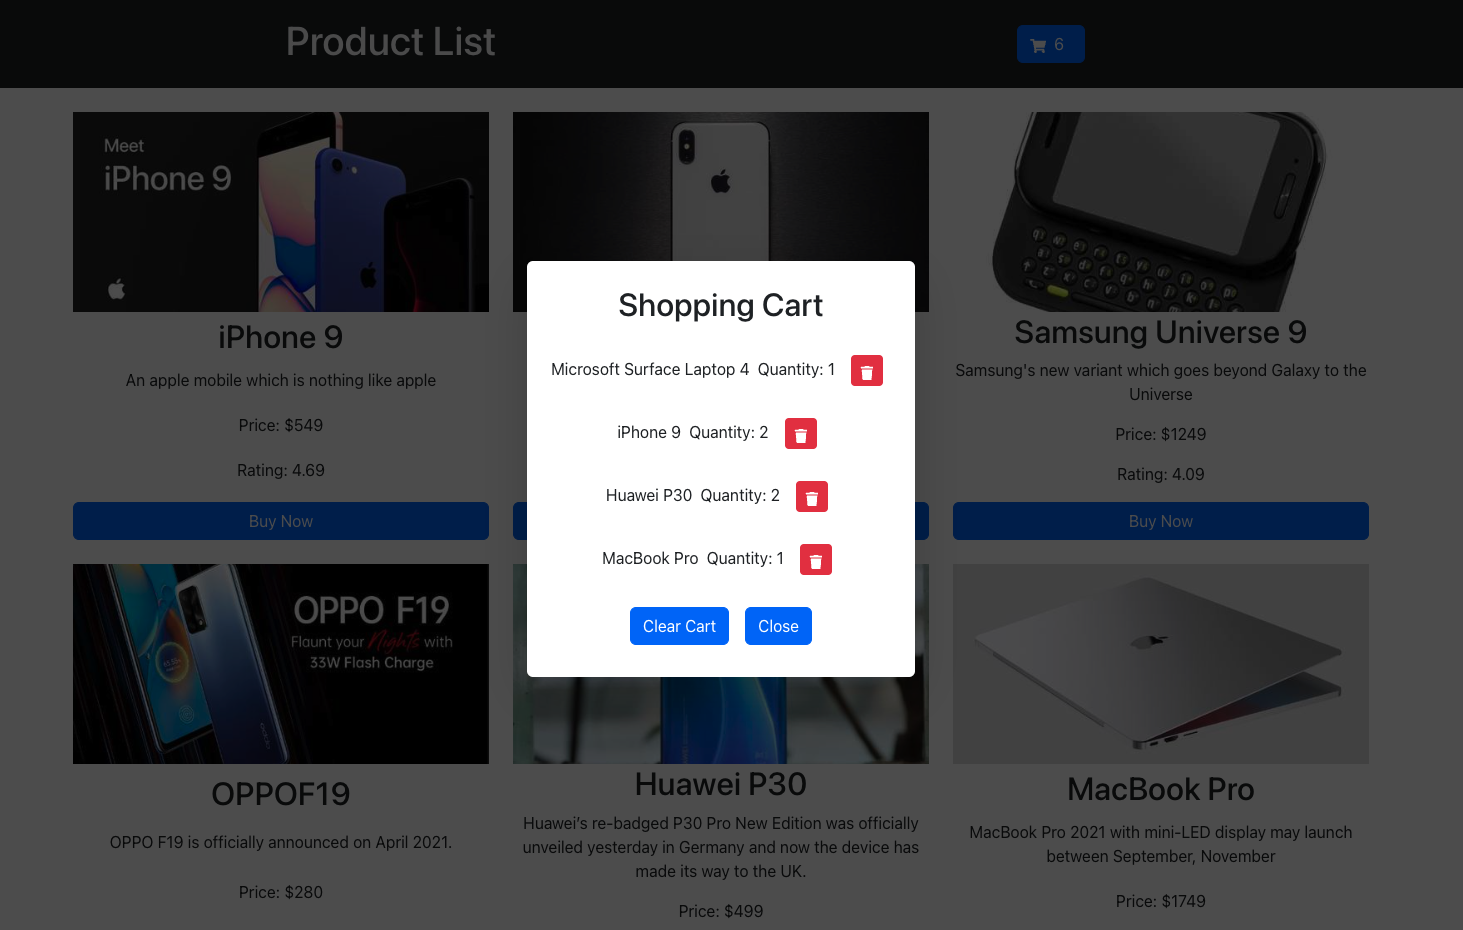
The result of this tutorial will be a web application that looks like this:
Prerequisites
If you don’t already have them, you’ll need to install the following tools:
Note: I recommend you to use
nvm
to manage NodeJs and npm versions.
After installing nvm, you can easily get any version of node by running nvm install <node_version>.
nvm will automatically install the corresponding npm version.
Getting Started
Firstly, you’ll need to create a new project with a server and a client. The server will be responsible for communicating (storing, retrieving, updating, deleting) with the Redis database. The client will render the products available in the store and allow the user to add them to the shopping cart.
To get started with a template, install genezio using npm and run it in your terminal.
Later on, genezio comes in handy to deploy and host your web applications in the cloud.
npm install -g genezio
After installing genezio, you can create a new genezio application by running the following command:
genezio create fullstack --backend=ts --frontend=react-ts --name=my-online-store --region=us-east-1
Setting up the backend
Now that you have a template to start from, fire up your favorite code editor and open the project’s directory.
The following piece of code will connect you to a Redis database and allow you to store and retrieve items to the shopping cart based on a session ID. This approach will be useful to accommodate more than 1 user on your web app.
Create a new file called shoppingCartService.ts in the server directory and paste the following code snippet into it.
server/shoppingCartService.ts

import { GenezioDeploy } from "@genezio/types";
import Redis from "ioredis";

export type CartItem = {
  title: string;
  count: string;
};

@GenezioDeploy()
export class ShoppingCartService {
  client: Redis;

  constructor() {
    if (!process.env.UPSTASH_REDIS_URL) {
      throw new Error(
        "It seems that UPSTASH_REDIS_URL is not set in the `.env` file."
      );
    }
    this.client = new Redis(process.env.UPSTASH_REDIS_URL);
  }

  async addItemToCart(sessionId: string, item: string): Promise<string> {
    // increment item count by 1 for a given item corresponding to the sessionId
    await this.client.hincrby("cart:" + sessionId, item, 1).catch((err) => {
      throw new Error(err);
    });

    return "success";
  }

  async getCart(sessionId: string): Promise<CartItem[]> {
    // get all items from the hashmap corresponding to the sessionId
    const cart = await this.client.hgetall("cart:" + sessionId).catch((err) => {
      throw new Error(err);
    });
    // check if the cart is empty
    if (Object.keys(cart).length === 0) {
      console.error("Cart is empty");
      return [];
    }

    // map cart items to an array of CartItem objects
    const cartItems: CartItem[] = [];
    for (const key in cart) {
      const item = {
        title: key,
        count: cart[key]
      };
      cartItems.push(item);
    }

    return cartItems;
  }
}
At this point, you are probably asking yourself what hincrby or hgetall are actually doing.
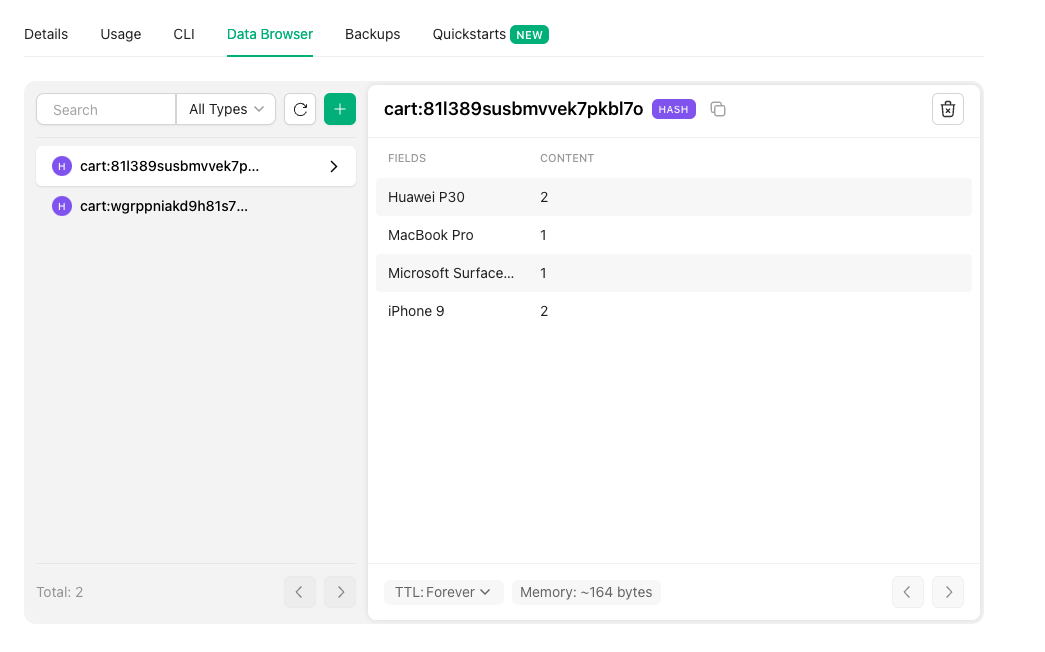
The Redis database has the following structure - each entry is uniquely identified by a key cart:uniqueSessionId and it points to a hashmap that contains pairs of item:count for each item in the shopping cart.
hincrby is a command that increments the value of a hashmap key by a given amount - for this example, it means it increments the counter for a specific bought product. If the key does not exist, it is created and set to 0 before actually incrementing it. hincrby can also be used to decrement the value of a hashmap key by a given amount.
hgetall is a command that returns all the fields and values of the hashmap for a specific session id.
Later in this tutorial, we are going to use hexists to check if an item exists in the hashmap and hdel to delete an item from the hashmap.
Install the dependencies by running the following command in the server directory:
npm install ioredis
npm --save-dev install @types/node
Right now, the backend won’t work properly because there is no UPSTASH_REDIS_URL environment variable set in the .env.
Let’s create a Redis database and connect it to your web application using a .env file.
Luckily, genezio makes it very easy to add an Upstash Redis integration to your project. We first need to deploy our project. We can do this by running the following command in the root directory of the project:
genezio deploy
This will prompt you to log in to your Genezio account. After the login is successful, the deployment will continue.
When the deployment is complete, go to the genezio dashboard and add an Upstash Redis integration to your project.
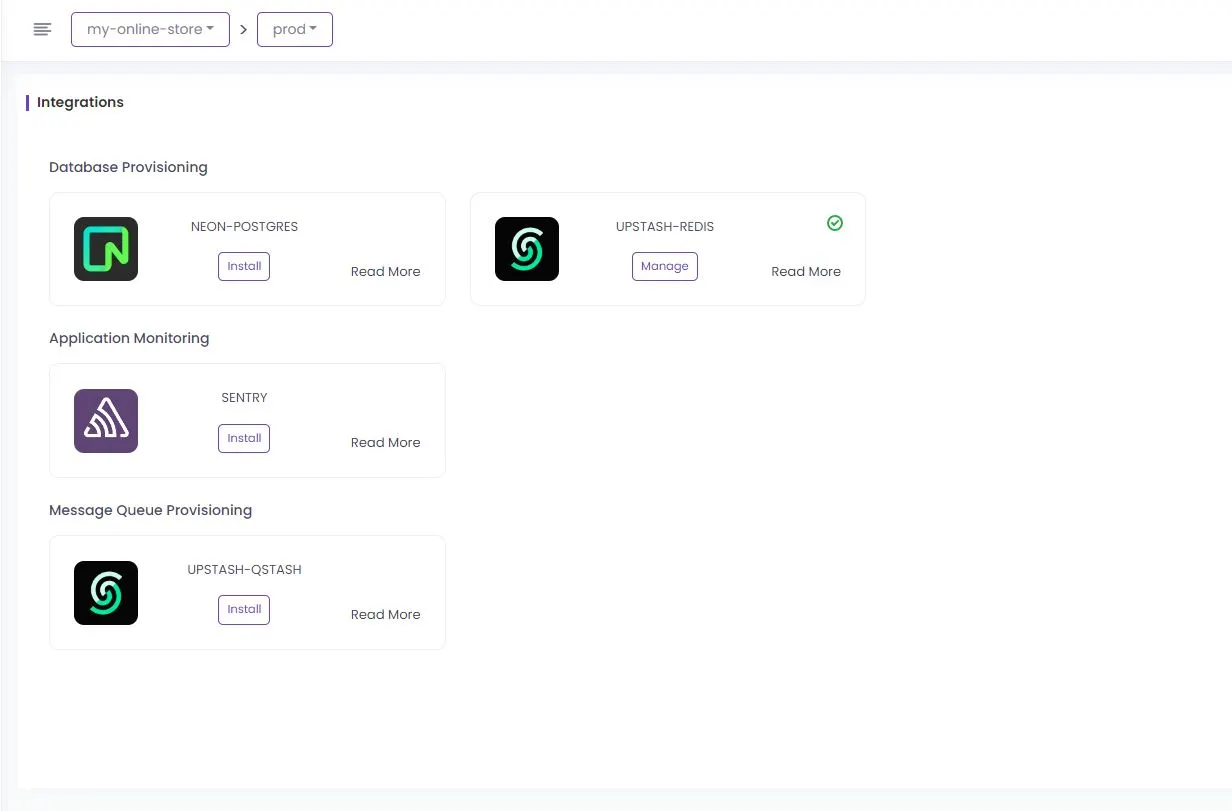
If you get stuck at this step, you can follow the Upstash Redis integration tutorial .
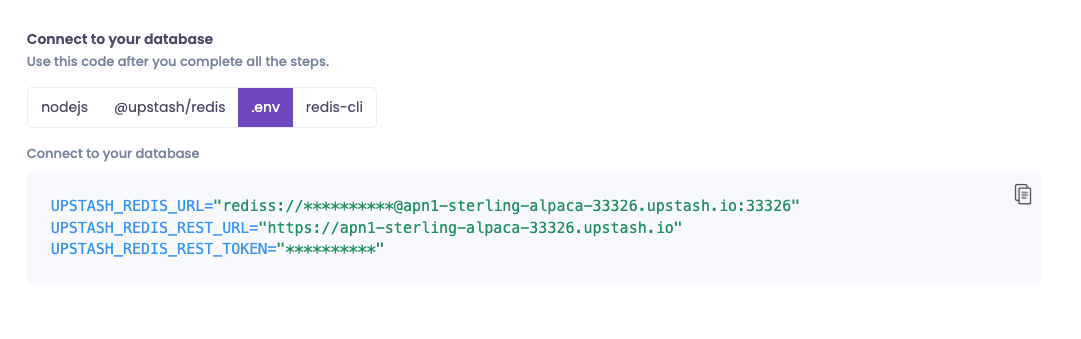
After adding the Upstash Redis integration, copy the environment variables from the .env section. Use the copy button to disclose the contents of the environment variables and copy them to your clipboard.
Go back to your server directory, create a new file called .env, and paste the contents there.
To test the code, you can run genezio local in the project directory.
This will start a fast local development server on your machine.
genezio local
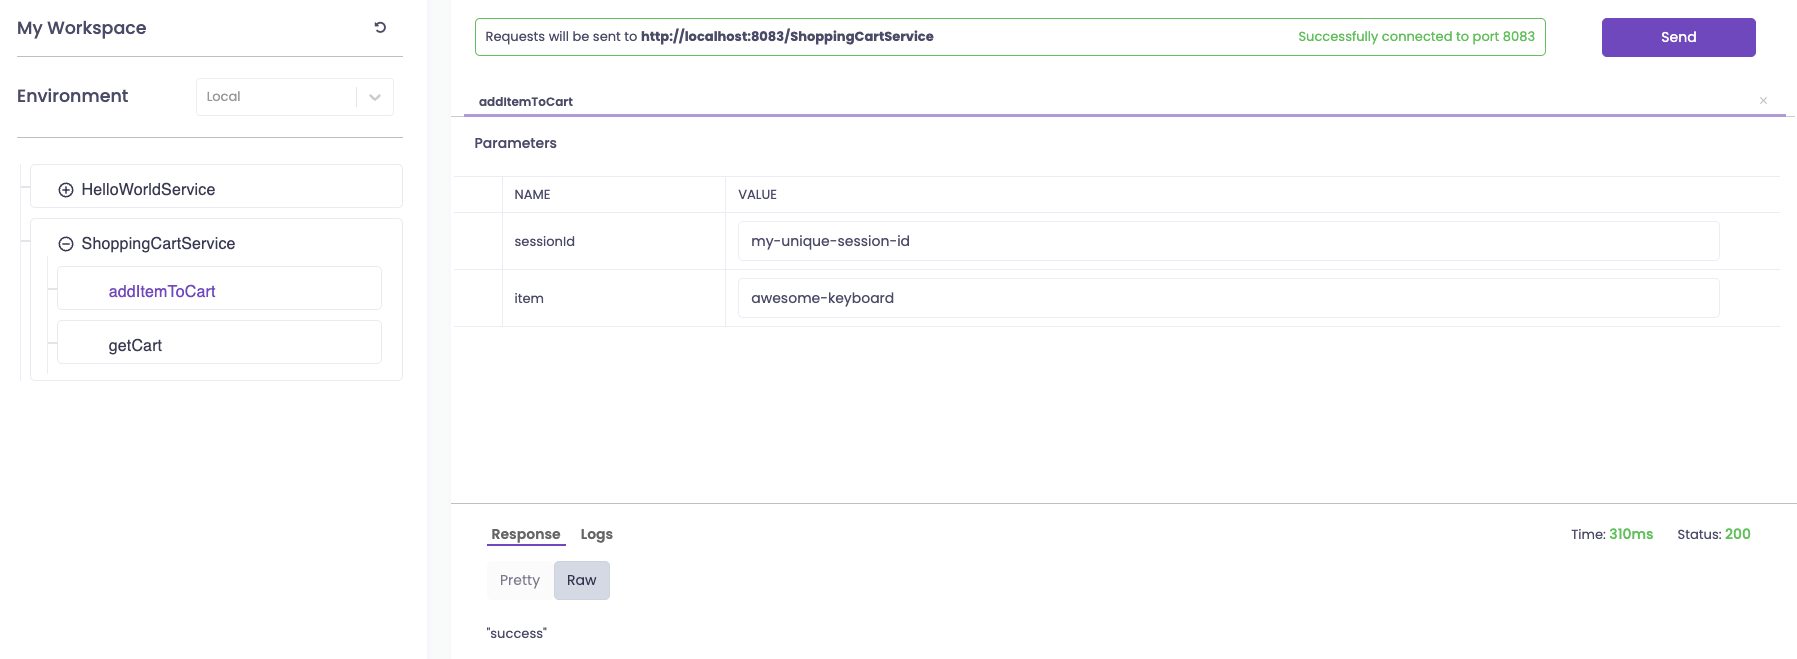
You can test your application from the genezio dashboard by following the URL exposed in the terminal by genezio local.
~ genezio local
Test your code at http://localhost:8083/explore
From the genezio dashboard, you can send requests to your backend classes and see the response.
You’ll also need 2 more methods in the backend source code - a method to remove only one item from the cart and a method to delete the entire cart.
Add the following methods to the ShoppingCartService class:
server/shoppingCartService.ts

  async removeItemFromCart(sessionId: string, item: string): Promise<string> {
    // check if the item exists in the hashmap
    const itemExists = await this.client.hexists('cart:' + sessionId, item).catch((err) => {
      throw new Error(err);
    });
    if (!itemExists) {
      throw new Error("Item does not exist");
    }

    // decrement item count by 1 for a given item corresponding to the sessionId
    await this.client.hincrby('cart:' + sessionId, item, -1).catch((err) => {
      throw new Error(err);
    });

    // check if the item count is 0 for a specific item, if so delete the entry from the hashmap
    const itemCount = await this.client.hget('cart:' + sessionId, item).catch((err) => {
      throw new Error(err);
    });
    if (itemCount && parseInt(itemCount) === 0) {
      await this.client.hdel('cart:' + sessionId, item).catch((err) => {
        throw new Error(err);
      });
    }
    return "success";
  }

  async deleteCart(sessionId: string): Promise<string> {
    // check if the cart exists
    const cartExists = await this.client.exists('cart:' + sessionId).catch((err) => {
      throw new Error(err);
    });
    if (!cartExists) {
      throw new Error("Cart does not exist");
    }

    // delete the cart corresponding to the sessionId
    await this.client.del('cart:' + sessionId).catch((err) => {
      throw new Error(err);
    });

    return "success";
  }
Note: There is no need to restart genezio local. The process will detect any changes in your code and restart automatically.
Now that your backend logic is ready, you can thoroughly test it by sending requests to it from the genezio dashboard .
Setting up the frontend
Going forward, you’ll need to create a React app to render the products available in the store and allow the user to add them to the shopping cart.
For this tutorial, the online store will be populated with dummy products using dummyjson . This API will return a list of dummy products in JSON format with various fields.
Let’s render the products in the online store. To avoid writing a lot of CSS, you can use Bootstrap to style your application. Bootstrap provides a lot of ready-to-use components that you can use.
In this section of the tutorial, there are quite a few code snippets coming your way. If you ever feel lost, you can check out the codebase for this tutorial on the GitHub repository .
Expand for more details on how to structure a React project
A typical React project has the following directory structure:
.
├── README.md
├── build/
├── public/
├── src
│   ├── App.css
│   ├── App.tsx
│   ├── index.css
│   ├── index.tsx
│   ├── models.tsx
│   ├── react-app-env.d.ts
│   └── reportWebVitals.ts
├── package-lock.json
├── package.json
└── tsconfig.json
In the build directory there is the bundle source code for the web application. This directory is generated when you run npm run build in the project directory. This will also be uploaded and host in the cloud to be accessible for your users.
In the public directory you can store static files that will be used in your application. For example, you can store images, fonts, or other assets in this directory.
In the src directory you can find the source code for your application. The index.tsx file is the entry point for your application. This file will be responsible for rendering the App component in the public/index.html file.
The App.tsx file is the main component of your application. This component will be responsible for rendering the other components in your application. This is where you’ll write most of your code.
In the models.tsx file you can declare the interfaces that will be used in your application. This file will be useful to keep track of the data types used in your application.
Firstly, let’s install the dependencies for the frontend by running the following command in the client directory of your project:
npm install axios reactstrap bootstrap
Import Bootstrap in your frontend application by adding the following line in client/src/main.tsx:
import "bootstrap/dist/css/bootstrap.min.css";
Create a new file named client/src/models.tsx to declare the interfaces that will be used in the application.
client/src/models.tsx

// The fields declared for the dummy data
export interface Product {
  id: number;
  title: string;
  description: string;
  price: number;
  rating: number;
  thumbnail: string;
}

// Information needed for a cart item
export interface CartItem {
  title: string;
  count: string;
}
Open client/src/App.tsx in your IDE and remove the existing code. We’ll start from scratch for a better understanding.
Add a header with a shopping cart button.
client/src/App.tsx

  // Toggle the cart modal
  const toggleCartModal = (e: any) => {
    e.preventDefault();
    setIsCartVisible(!isCartVisible);
  };

    <div className="App">
      <div className="bg-dark text-light p-3">
        <div className="container">
          <div className="row align-items-center">
            <div className="col">
              <h1>Product List</h1>
            </div>
            <div className="col text-right">
              <Button color="primary" onClick={(e) => toggleCartModal(e)}>
                <FaShoppingCart />
                {purchasedQuantity > 0 && (
                  <span className="m-2">{purchasedQuantity}</span>
                )}
              </Button>
            </div>
          </div>
        </div>
      </div>
Create a state to keep track if the cart button was clicked. This state will be used to toggle the cart modal on and off.
client/src/App.tsx

const [isCartVisible, setIsCartVisible] = useState(false);

// Toggle the cart modal
const toggleCartModal = (e: any) => {
  e.preventDefault();
  setIsCartVisible(!isCartVisible);
};
To start the frontend on your localhost, run npm run dev. This will initialize the frontend application on localhost:5173.
Keep the frontend running in the background and open localhost:5173 in your browser to see the changes in real-time every time you change the source code.
Add a list with the fetched products.
client/src/App.tsx

<Container className="my-4">
  <Row className="justify-content-around">
    {productData.products.map((product) => (
      <Col key={product.id} md="4" className="mb-4">
        <div className="product-card">
          <img src={product.thumbnail} alt={product.title} />
          <h2>{product.title}</h2>
          <p>{product.description}</p>
          <p>Price: ${product.price}</p>
          <p>Rating: {product.rating}</p>
          <Button
            color="primary"
            onClick={(e) => handleBuyClick(e, product)}
            disabled={addItemLoading[product.id]}
          >
            {addItemLoading[product.id] ? (
              <Spinner size="sm" color="light" />
            ) : (
              "Buy Now"
            )}
          </Button>
        </div>
      </Col>
    ))}
  </Row>
</Container>
Add a modal that opens when the shopping cart button is clicked. In the modal, we’ll display the content of the shopping cart and allow the user to close the cart, clear the cart, or delete an item from it.
client/src/App.tsx

{
  isCartVisible && (
    <div
      className="cart-overlay d-flex justify-content-center align-items-center position-fixed top-0 left-0 w-100 h-100"
      style={{ background: "rgba(0, 0, 0, 0.7)" }}
    >
      <div className="cart-modal bg-white p-4 rounded shadow-lg">
        <h2 className="mb-4 center">Shopping Cart</h2>
        <ul className="list-unstyled">
          {cartData.length > 0 ? (
            cartData.map((cartItem, index) => (
              <li key={index} className="mb-3">
                <div>
                  <span>{cartItem.title}</span>
                  <span className="m-2">Quantity: {cartItem.count}</span>
                  <Button color="danger" size="sm" className="m-2">
                    {" "}
                    <FaTrash />{" "}
                  </Button>
                </div>
              </li>
            ))
          ) : (
            <li className="empty-cart">Your cart is empty</li>
          )}
        </ul>
        {cartData.length > 0 ? (
          <Button color="primary" className="m-2">
            {" "}
            'Clear Cart'{" "}
          </Button>
        ) : null}
        <Button color="primary" className="m-2">
          {" "}
          'Close'{" "}
        </Button>
      </div>
    </div>
  );
}
Add a token in local storage to keep track of the session id. This token will be used to identify the cart corresponding to the user.
client/src/App.tsx

// Check if the token is set in localStorage
let token = localStorage.getItem("token") as string;

// If token is not set, generate a 32-character token
if (!token || token === "" || token === "undefined") {
  token = Math.random().toString(36).substring(2, 15) + Math.random().toString(36).substring(2, 15);
  localStorage.setItem("token", token);
}
Send a request to the backend to add an item to the cart when the Buy now button is clicked.
client/src/App.tsx

const handleBuyClick = async (e: any, product: Product) => {
  e.preventDefault();

  // You can implement your buy logic here, e.g., add the product to a cart
  await ShoppingCartService.addItemToCart(token, product.title);
};
Send a request to the backend to retrieve the cart data when the modal is opened.
client/src/App.tsx

// Fetch the cart contents when the cart modal is visible
useEffect(() => {
  if (isCartVisible) {
    const fetchCartData = async () => {
      try {
        // Call your ShoppingCartService.getCart method to the contents of the cart
        const cart = await ShoppingCartService.getCart(token);
        setCartData(cart);
      } catch (error) {
        console.error("Error fetching or parsing cart data:", error);
      }
    };

    fetchCartData();
  }
}, [isCartVisible, token]);
Send a request to the backend to delete an item from the cart when the Delete button is clicked.
client/src/App.tsx

const handleDeleteItem = async (e: any, cartItem: CartItem) => {
  e.preventDefault();

  await ShoppingCartService.removeItemFromCart(token, cartItem.title);

  // You can implement your delete logic here
  const updatedCartData = await ShoppingCartService.getCart(token);
  setCartData(updatedCartData);
};
Send a request to the backend to clear the cart when the Clear Cart button is clicked.
client/src/App.tsx

const handleClearCart = async (e: any) => {
  e.preventDefault();

  // You can implement your clear cart logic here
  await ShoppingCartService.deleteCart(token);

  // Update the cart data
  const updatedCartData = await ShoppingCartService.getCart(token);
  setCartData(updatedCartData);
};
Finally, we still need to add a little bit of CSS to make sure everything looks nice and tidy. Add the following code snippet in the App.css file.
client/src/App.css

#root {
  max-width: 1280px;
  margin: 0 auto;
  padding: 2rem;
  text-align: center;
}

.App {
  text-align: center;
}

.product-card {
  text-align: center;
  display: flex;
  flex-direction: column; /* Arrange content vertically */
  justify-content: space-between; /* Push content to the top and bottom */
  height: 100%; /* Allow the card to take full height */
}

.product-card img {
  max-width: 100%;
  height: 200px; /* Adjust the height to your desired consistent height */
  object-fit: cover; /* Maintain aspect ratio and cover the container */
}

@keyframes App-logo-spin {
  from {
    transform: rotate(0deg);
  }
  to {
    transform: rotate(360deg);
  }
}
Deploying the application
Your application is now ready to be deployed to the cloud to be used by your clients.
To deploy your application, run the following command in the root directory of your project:
genezio deploy
This will deploy the whole project to the cloud and make it available to your users using the subdomain you specified in the genezio.yaml file.
You can continue to manage, test, update and monitor your project from the genezio dashboard.
Improvements
If you feel tired you can jump to the conclusions section. But if you want to improve your web development skills, here are some ideas to extend the application.
Add a counter for the number of items in the cart
It would be great if the user could see the number of items in the cart each time the Buy now button is clicked.
This way, the user has a visual indication that the item was successfully added to the cart.
Add a new state to keep track of the number of items in the cart.
client/src/App.tsx

const [purchasedQuantity, setPurchasedQuantity] = useState(0);

const handleBuyClick = async (e: any, product: Product) => {
  // ...

  // Update the local state to reflect the purchased quantity
  setPurchasedQuantity((prevQuantity) => prevQuantity + 1);

  // ...
};

const handleDeleteItem = async (e: any, cartItem: CartItem) => {
  // ...

  // Update the local state to reflect the purchased quantity
  setPurchasedQuantity((prevQuantity) => prevQuantity - 1);

  // ...
};

const handleClearCart = async (e: any) => {
  // ...

  // Update the local state to reflect the purchased quantity
  setPurchasedQuantity(0);

  // ...
};

return (
  <Button color="primary" onClick={(e) => toggleCartModal(e)}>
    <FaShoppingCart />
    {purchasedQuantity > 0 && <span className="m-2">{purchasedQuantity}</span>}
  </Button>
);
This state should be updated each time an item is added or removed from the cart. When the cart is cleared, the state should be reset to 0.
Add spinners animation for loading states
To improve the UI even further, you can add spinners to indicate loading states on the buttons that are sending requests to the backend.
Each button should have its own loading state to indicate that the request is being processed.
Below is an example of how to add a loading state to the Buy now button.
client/src/App.tsx

const [addItemLoading, setAddItemLoading] = useState<{
  [key: number]: boolean;
}>({});

const handleBuyClick = async (e: any, product: Product) => {
  // Set loading state to true to show the spinner
  setAddItemLoading((prevStates) => ({ ...prevStates, [product.id]: true }));

  // ...

  // Set loading state to false to hide the spinner
  setAddItemLoading((prevStates) => ({ ...prevStates, [product.id]: false }));
};

return (
  <Button
    color="primary"
    onClick={(e) => handleBuyClick(e, product)}
    disabled={addItemLoading[product.id]}
  >
    {addItemLoading[product.id] ? (
      <Spinner size="sm" color="light" />
    ) : (
      "Buy Now"
    )}
  </Button>
);
Conclusion
Congratulations! 🥳
The codebase for this tutorial is open-source, and you can find it in this GitHub repository .
I hope you enjoyed this tutorial and I encourage you to check out our other tutorials for more tips and tricks on improving your software engineering skills. 🥷 💻
Subscribe to our newsletter
Genezio is a serverless platform for building full-stack web and mobile applications in a scalable and cost-efficient way.
Related articles


More from Tutorials
Implement a newsletter on static websites with Mailchimp or HubSpot
Tudor Anghelescu
Mar 21, 2024