Integrate Stripe Payments with a Genezio Backend and React

20 minutes read

Radu Dumitrescu
Mar 05, 2024
Share on:
This guide will walk you through integrating Stripe payments using a genezio backend and a React frontend. Integrating a web app with a payment gateway can be challenging, even if Stripe provides most of the functionality out of the box. There are numerous approaches to managing Stripe API integration on the backend. In this tutorial, I’ll share with you the method I believe to be most efficient and in line with Stripe API official recommendations. Genezio significantly simplifies the process, freeing you from concerns about deployment and ensuring smooth communication between the backend and frontend.
Content
- Prerequisites
- Getting Started
- Install the Dependencies
- Set up the backend
- Set up the webhook
- Set up the frontend
- Deploy the application
- Create a Stripe account and get the API keys
- Setup the Environment Variables
- Conclusion
Prerequisites
If you don’t already have them, you’ll need to install the following tools:
Note: I recommend you use nvm to manage NodeJs and npm versions. After installing nvm, you can easily get any node version by running nvm install <node_version>.
Getting Started
First, you’ll need to create a new project.
To get started with a template, install genezio CLI using npm. You will also need to login to the genezio cloud. Later on, genezio comes in handy to deploy and host your web applications in the cloud.
npm install -g genezio
genezio login
After installing genezio, you can create a new genezio Node.js project by running the following command in an empty new folder:
genezio create fullstack --frontend=onboarding-react --backend=onboarding-ts --name=stripe-integration --region=us-east-1
The genezio create command can be run as above or it can be run as a wizard through which you can configure your new project. More information can be found here .
Install the Dependencies
For your backend you will need to install the stripe-js package:
cd ./stripe-integration/server
npm install stripe
We will use stripe-js to create new Stripe checkout sessions and to verify payments.
Set up the backend
Now let’s create a server-side service in the backend folder called StripeService.ts.
For this tutorial, we will use TypeScript, but you can also use JavaScript and Go (experimental).
server/StripeService.ts

import {
  GenezioDeploy,
  GenezioMethod,
  GenezioHttpRequest,
  GenezioHttpResponse,
} from "@genezio/types";
import Stripe from "stripe";
// Use the Stripe API Key clientSecret to initialize the Stripe Object
const stripe = new Stripe(process.env.STRIPE_SECRET_KEY!);

@GenezioDeploy()
export class StripeService {
  async createCheckoutSession(): Promise<string> {
    const stripePromise = await stripe.checkout.sessions.create({
      line_items: [
        {
          price_data: {
            currency: "usd",
            product_data: {
              name: "T-shirt",
            },
            unit_amount: 2000, // 20.00 USD
          },
          quantity: 1,
        },
      ],
      mode: "payment",
      success_url: `${process.env.FRONTEND_URL}?success=true`,
      cancel_url: `${process.env.FRONTEND_URL}?canceled=true`,
    });

    return stripePromise.url || "";
  }
}
First, we import the GenezioDeploy decorator. It will be added to the StripeService class to signal to genezio that the class needs to be deployed.
The GenezioMethod, GenezioHttpRequest, GenezioHttpResponse will be used later on.
Next, we import and initialize the Stripe object with the secret key.
In the StripeService class we create a method createCheckoutSession. This method will be called from the frontend react app to get the URL for the Checkout Session.
Ensure that confidential details concerning your product inventory, such as price and availability, are stored on your server to avoid any potential alterations by customers from the client side.
When creating the Checkout Session, specify product information using price_data, or opt for using
pre-configured prices from the Stripe dashboard by providing their IDs
.
Note 1: The checkout session has three modes: payment, subscription , or setup .
Note 2: For one-time purchases, we will use mode: "payment".
Note 3: The function stripe.checkout.sessions.create takes the argument a JSON object
For the success_url and cancel_url, we’ll leverage our frontend react application to redirect the user at the end of the checkout process.
Set up the webhook
After a successful payment, Stripe notifies to the genezio backend so you can fulfill the order.
To do that, we will set up a webhook function in our service. A webhook is an API call made between 2 servers. In our case between the Stripe backend and the genezio backend.
Add a new function in your backend service class.
server/StripeService.ts

@GenezioMethod({ type: "http" })
async webhook(req: GenezioHttpRequest): Promise<GenezioHttpResponse> {
  let event: Stripe.Event;

  try {
    event = stripe.webhooks.constructEvent(
      req.rawBody,
      req.headers["stripe-signature"],
      process.env.STRIPE_WEBHOOK_SECRET!
    );
  } catch (err) {
    return { statusCode: "400", body: "Webhook Error" };
  }

  // Handle the checkout.session.completed event
  if (event.type === "checkout.session.completed") {
    const session = event.data.object;
    console.log("Fulfilling order", session);

    // TODO: your own custom fulfillment process
  }

  return { statusCode: "200", body: "Success" };
}
We use the Decorator @GenezioMethod({ type: "http" }) to let genezio know we want this function to be a webhook.
We use the STRIPE_WEBHOOK_SECRET from the Stripe Dashboard to check that the webhook is coming from Stripe and not from an attacker.
After the TODO you can add your login for payment fulfillment.
Now run your backend local server in the server folder using the following command:
genezio local
Set up the frontend
Now that our backend is fully configured, it’s time to shift our focus to the frontend. The React application frontend features a straightforward view with a button and a message component. This button initiates a request to the backend to retrieve the Checkout URL. The messages component indicates whether the payment was successful or not.
client/src/App.tsx

import { useState, useEffect } from "react";
import reactLogo from "./assets/react.svg";
import "./App.css";

import { StripeService } from "@genezio-sdk/stripe-integration";

const ProductDisplay = ({ handleSubmit }: { handleSubmit: () => void; }) => (
  <>
    <div>
      <a href="https://genezio.com" target="_blank">
        <img src="https://raw.githubusercontent.com/Genez-io/graphics/main/svg/Logo_Genezio_White.svg"
          className="logo genezio light"
          alt="Genezio Logo"/>
        <img src="https://raw.githubusercontent.com/Genez-io/graphics/main/svg/Logo_Genezio_Black.svg"
          className="logo genezio dark"
          alt="Genezio Logo"/>
      </a>
      <a href="https://react.dev" target="_blank">
        <img src={reactLogo} className="logo react" alt="React logo" />
      </a>
    </div>
    <div className="card">
      <button onClick={(e) => {
          e.preventDefault();
          handleSubmit();
      }}>
        Buy a T-Shirt with Stripe
      </button>
    </div>
  </>
);

const Message = ({ message }: { message: string }) => (
  <section>
    <p>{message}</p>
  </section>
);

export default function App() {
  const [message, setMessage] = useState("");

  const handleSubmit = async () => {
    const url = await StripeService.createCheckoutSession().catch((err) => {
      console.error(err);
      return null;
    });
    if (url) {
      window.location.href = url;
    }
  }

  useEffect(() => {
    // Check to see if this is a redirect back from Checkout
    const query = new URLSearchParams(window.location.search);

    if (query.get("success")) {
      setMessage("Order placed! You will receive an email confirmation.");
    }

    if (query.get("canceled")) {
      setMessage(
        "Order canceled -- continue to shop around and checkout when you're ready."
      );
    }
  }, []);

  return message ? (
    <Message message={message} />
  ) : (
    <ProductDisplay handleSubmit={handleSubmit} />
  );
}
The function handleSubmit calls the backend through the genezio SDK imported on the top of the file
import { StripeService } from "@genezio-sdk/stripe-integration";.
Deploy the application
Now we have everything set up and it’s time to deploy the application to the genezio cloud with only one simple command.
Run this command in the root folder on your project:
genezio deploy
After the deployment succeeds you will need to save 2 important links from the output of the command.
- The webhook URL that looks like this: StripeService.webhook: <webhook_url>
- The frontend URL: Frontend successfully deployed at <frontend_url>
These 2 links can be also found on your project page in the dashboard later on.
Create a Stripe account and get the API keys
If you don’t already have a Stripe account, you can create one using this link .
Setup the environment variables
Open the genezio dashboard and find your project from the projects list.
On the project page click the Environment Variables button and now let’s add them.
We need 3 environment variables:
1. STRIPE_SECRET_KEY - Access this link and copy the Secret key. For this tutorial, you don’t need the publishable key.
Note: For this tutorial, we will use test API keys. When you move your application to production, make sure you change the API keys to production ones.
2. FRONTEND_URL - You have this URL from the genezio deploy output
3. STRIPE_WEBHOOK_SECRET - to get this secret you need to
access this link
and then click on Add Endpoint
In the Endpoint URL field, enter your webhook URL as provided in the output of genezio deploy.
Select the event to listen to checkout.session.completed.
The screen should look like this:
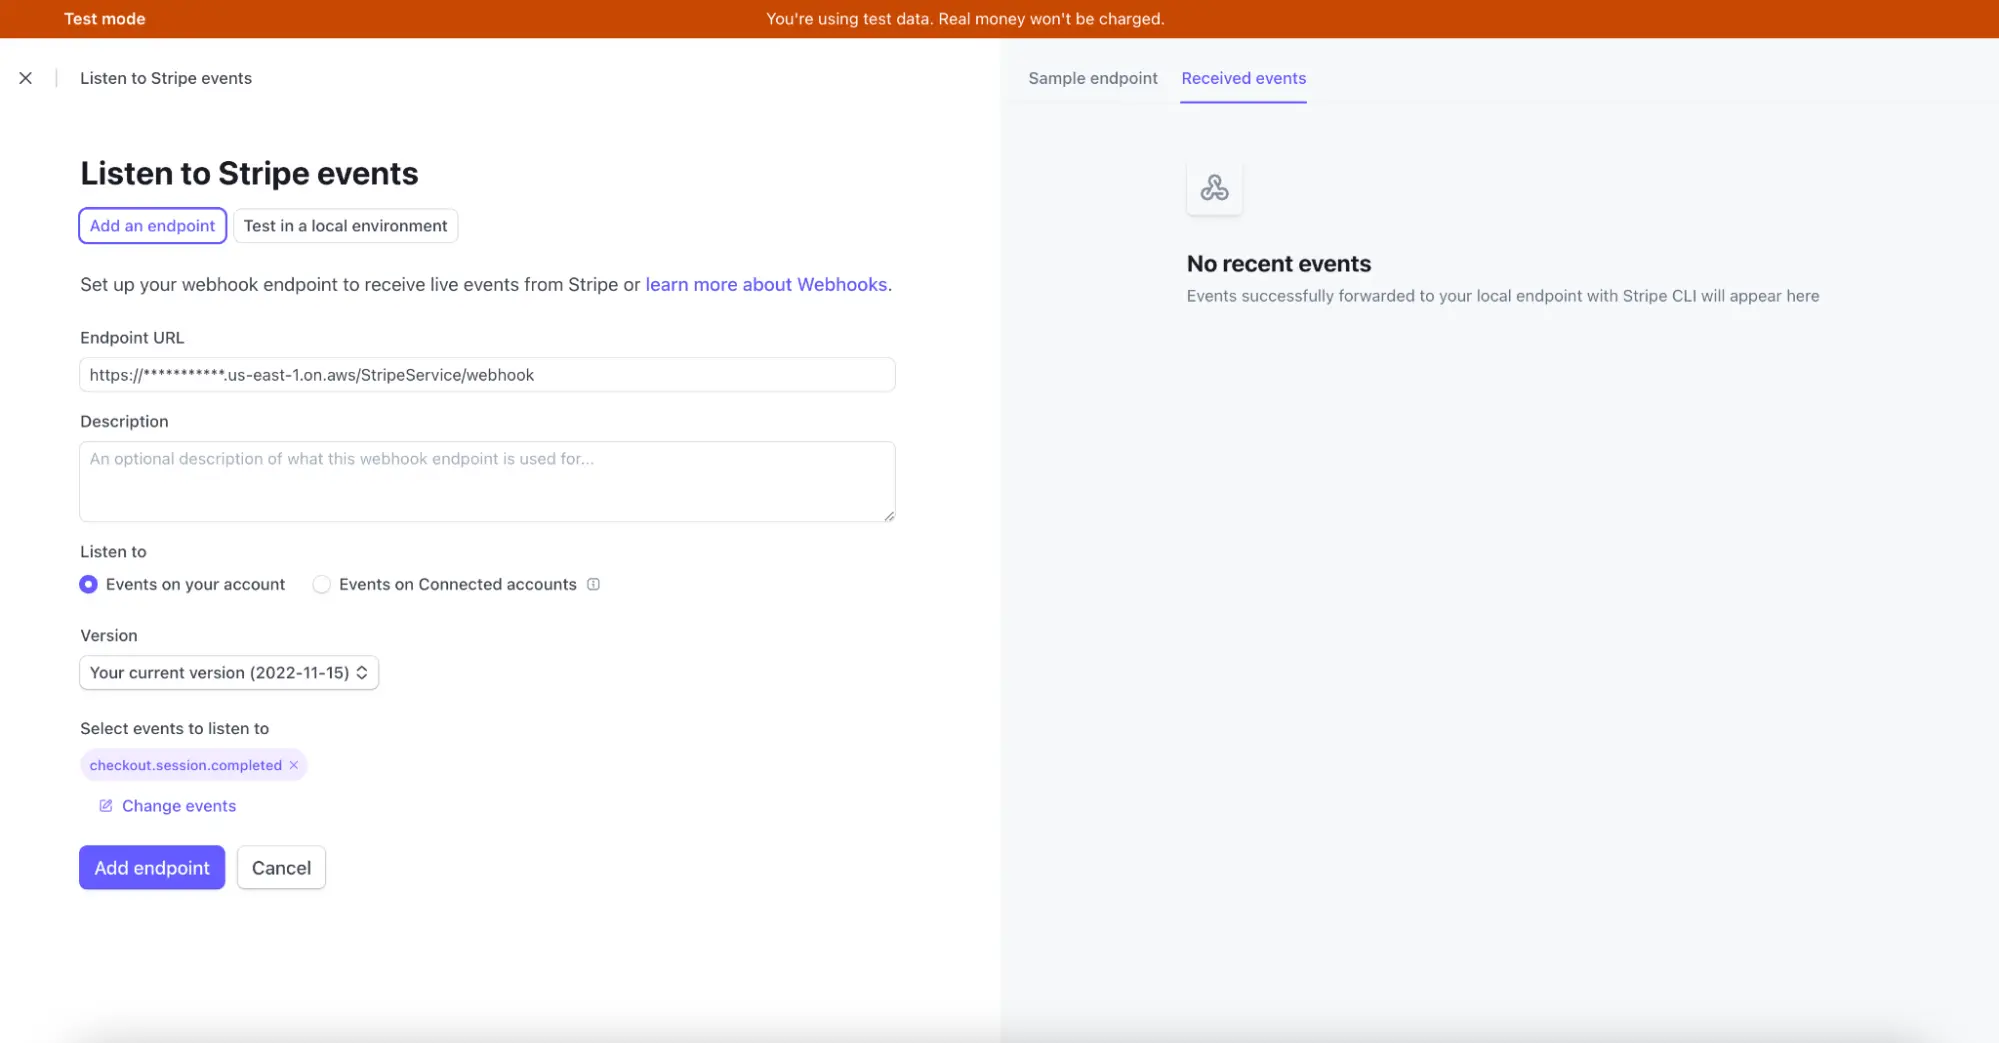
Now Press Add Endpoint.
After the Endpoint is created, press Reveal Signing Secret and copy it for the Environment Variable.
This is a look at our environment variables page after all the setup is complete.
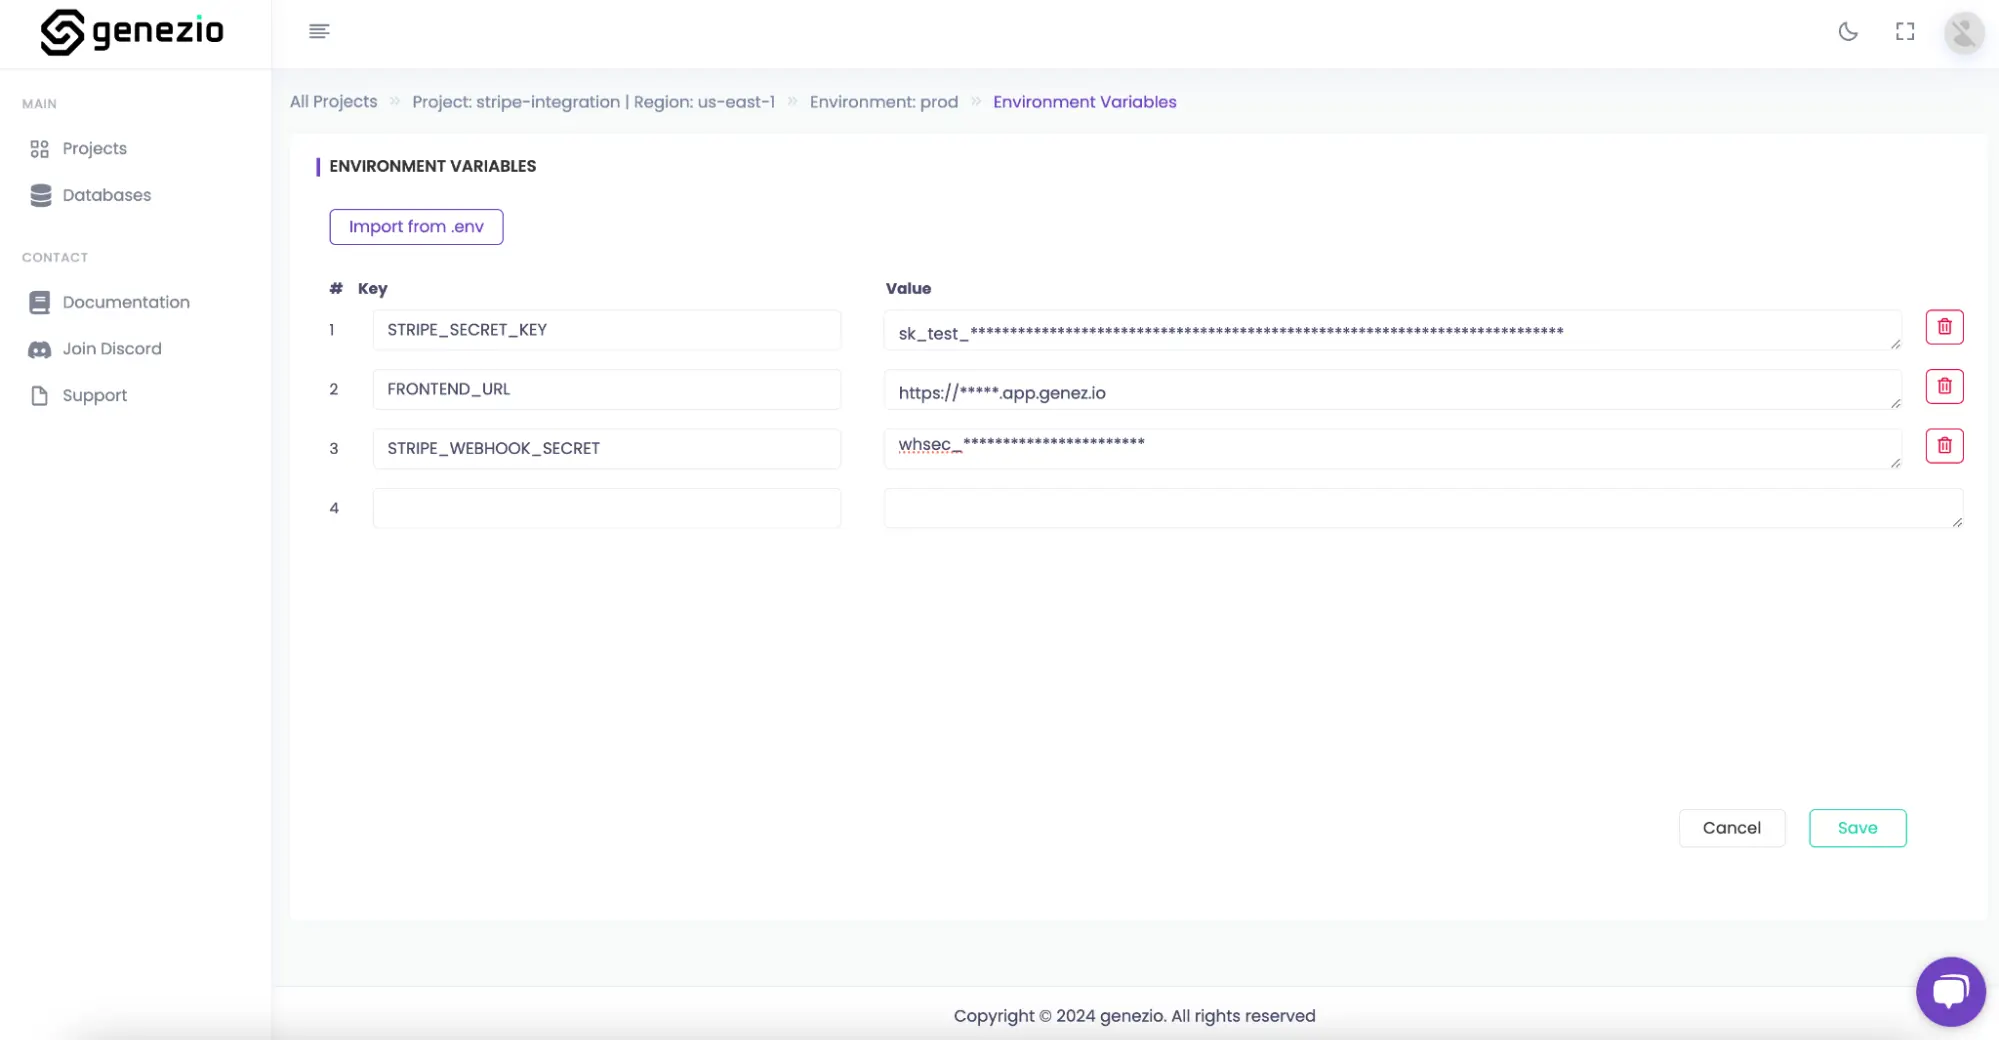
Simply hit ‘save’ and you’re all set to test your application in a cloud environment. Go to the frontend URL and test your app.
You can test your payment flow using one of the following test cards:
- Payment succeeds: 4242 4242 4242 4242
- Payment requires authentication: 4000 0025 0000 3155
- Payment is declined: 4000 0000 0000 9995
For the email, name, and CVC, feel free to enter any information you like, and for the expiration date, choose a future date.
Conclusion
To wrap things up, integrating Stripe Payments securely might seem straightforward at first glance, yet it demands meticulous attention to detail to execute correctly.
I hope you found this tutorial engaging, and I encourage you to dive into our other tutorials for more in-depth advice and strategies tailored for software engineers. 🥷💻
Additionally, I invite you to explore our examples on Github .
Start tapping into the potential of the genezio framework and platform to enhance your application’s capabilities and enrich your workflows with efficient payment solutions.
Subscribe to our newsletter
Genezio is a serverless platform for building full-stack web and mobile applications in a scalable and cost-efficient way.
Related articles


More from Tutorials